The Flipping, Christmas Advent Calendar
First off, Welcome Family Ever After readers!
I was very happy to be a guest blogger (my first) there this morning, where I shared a sneak peak at my latest creation:

AND, I would like to clarify my title it is a "Flipping" Christmas Advent Calendar-- because it literally flips back and forth. I did not mean it to sound like some crazy thing Napoleon Dynamite would say, "Flippin' calendar-- gosh."
Okay, glad we cleared that up!
I spoke a bit about what (or who) inspired me to make this calendar on the Family Ever After blog. So, now I'll get right into HOW to make this Advent Calendar.
MATERIALS:
1. Green fabric
2. Green Felt (I used a darker green and a lighter green)
3. Red embroidery thread
4. Felt in every color
5. Black fabric marker
6. Other items you'd like to add to your calendar squares (ribbons, buttons, pipe cleaners)
7. Craft Glue
8. Two packages of Stick-RZ Felt
9. Stampin' Pastels (if wanted, or chalk)
10. Printed off of pattern pages 1 & 2
FIRST, Print off page 1 and page 2.

(Right click on the images to save, and print on an 8x11 page to get the proper size)

Tape them together so they look like this.

Now we're going to get the tree ready.


I cut out 14 dark green and 11 light green squares.
Next we place all the felt on the backside of the tree fabric so we can trace out (with fabric chalk) exactly where they're going to be (for when we cut out the square shapes).


I was going to sew my tree with right sides together, then slip them inside out for a more finished look. But since the squares are so close to the edge I knew I couldn't do that. So I sewed the top fabric onto the felt with unfinished edges. Still wishing I had a serger....
This looked a bit messy, until I stitched a blanket stitch around the edges with the embroidery thread. Then it looked much better.
Here's how to do a blanket stitch:
Here's how to do a blanket stitch:


Here's a look at each of my Calendar Squares:

I made each piece by cutting out felt and gluing it on with craft glue. Sometimes I added pipe cleaners, buttons, or ribbons to complete the look.


I used a black fabric marker (fine tip) to draw on the eyes and others details to the felt.
When I was a teacher we were often given surplus supplies from the generous company Stampin' UP! I picked up this Stampin' Pastels kit back then and have used it a few times over the years. I was excited to pull it out again for my squares.


Ooh, almost done....

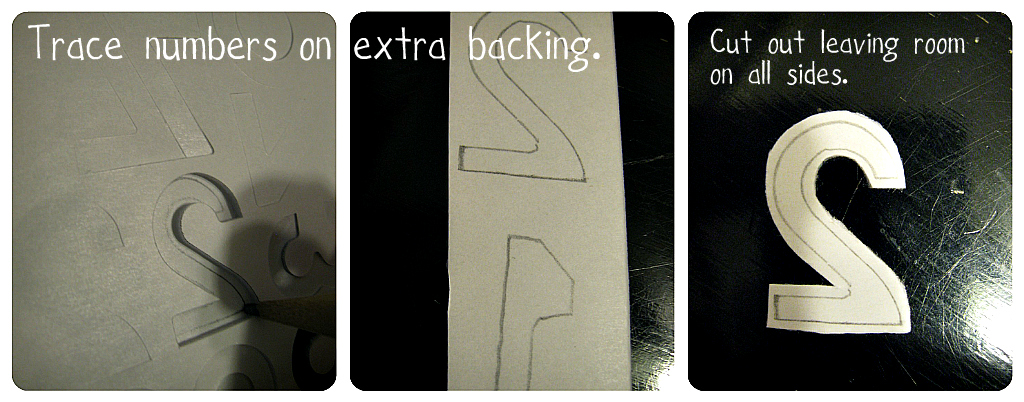
I bought two packages of these peel and stick stickers, but I knew I still wouldn't have enough 2s and 1s. I had to make five extra 1s, but only one extra 2.
Really, really almost done. Last step, sew the trunk together and sew it onto the Christmas tree.


And will you indulge me for a minute as I point out THREE things I really like about this Calendar?
1. No extra candy for the kids to eat each day.
2. Self Contained-- No losing extra pieces.
3. We are literally counting down to the birth of Christ. With baby Jesus being Number 1.
I had actually planned for the order to be different, with the Star being number one and baby Jesus resting under the star, but my husband pointed out that the true purpose of this calendar was to countdown to Christ's birth, so He should be first and Mary should be second. After some consideration-- I agreed.


Comments
Visiting from Happy House Project's Freestyle Friday linky party,
~Suzanne in NW Illinois
Come through to the front and sew into the bottom of your felt square, in and then back out to the back of the tree.
Then you're going to go to the top of where the felt square will be and go back in, catching the felt square, pull through-- in and back out, to the back of the tree, then make a knot. Repeat this for all the felt pieces.
Take a look at the pictures again if you need.
When the felt piece flips it's tucking in and around the two sewn in places on top and bottom.
Hope that helps!!
Let me know if you need further direction.